I suck at blogging

If you’re like me, you probably had, oh, I don’t know, 45 false starts at journaling over the years.

My pattern was consistent: buy (or accept the gift of) a pretty new journal, write one or two ernest posts, tuck journal away while awaiting the next inspired moment, discover it two to three years later, die of embarrassment over previous entries, tear out and tear up (or burn, or bury) the evidence. Repeat.

If I had saved any of these gems, I’d surely be the shining star of Mortified. As it is, it’s probably for the best that there’s relatively little evidence of my cheesiness and angst. Now I’ve just got this blog!

How much do I suck? I drafted this post in May 2013!

But since I last wrote I’ve become an accidental stay-at-home-mom (long story) to the world’s best baby and I’ve got a little (very little) time and inclination to pick up blogging again so I may get back to it. If for no one else than my dad, who is by far my most loyal reader.

Posted in Uncategorized

So if you haven’t been blogging…

…what have you been doing, exactly?

Pitifully little in my spare time, now that you mention it. But thanks for asking.

What I have been doing is working like crazy on launching an interactive product for 3rd-5th grade classrooms called Digital Passport:

Click through to read the press release and view the marketing video

Impressed? I thought you would be. Just for schools right now, but a home version is coming soon for all of you parents of 8-11-year-olds.

This is also proving to be my swan song for Common Sense Media and I’m shifting gears big time mid-September to join the team at ModCloth, purveyors of really cool vintage-inspired clothes and decor. I’m sad to leave my amazing team at Common Sense behind after more than six years, but it’s time to learn something new and I’m super excited about this new opportunity.

I’m also taking this major job and life shift as an opportunity to recommit myself to writing and blogging. In my new role I’ll be doing a lot less work-related writing so you can look forward to more frequent blabbing in this space. So…yay!

Posted in Uncategorized

Tamales…take two

Many months ago my cooking club came over and we tackled what we thought would be authentic and delicious tamales. Authentic tamales = lard. But within moments of opening the ominous looking tub of Manteca I knew we’d made a huge mistake.

Turns out that while authentic = lard, lard = freaking foul stuff that stinks up your whole house and makes tamales that coat your mouth in a nasty film. The tamales weren’t horrible but we all agreed that they left something to be desired.

Something…namely: butter.

As we all know, butter = the secret to all things delicious.

So Erl the Girl and I set out to take another crack at tamales with the help of this great recipe from October’s Cooking Light. We did the filling called for in the recipe, as well as a slow-cooked and shredded pork with green chili sauce, and, because it was the weekend following Thanksgiving, a turkey left-over tamale that turned out to be delicious. Oh, and chocolate. Also delicious.

One word to the wise: the steaming technique described in the magazine is far easier and more effective than using a steaming basket, but kiss the kitchen towel you use goodbye. It will look like this when all is said and done:

Minimize the damage by doing a few things:

  • WET the towel, don’t just dampen it.
  • Keep a spray bottle handy and spritz the towel every fifteen minutes or so
  • Position two oven racks in the center of the oven close to each other. Put the sheet pan with the tamales on the bottom rack and an empty sheet pan on the rack above it. This will help prevent burning.

Enjoy!

Posted in recipe

Everything’s Better with Bourbon: The Holiday Cookie Edition

I co-hosted a holiday cookie exchange at work and loved showing off my favorite holiday cookie: Bourbon Balls.

Bourbon’s having its moment right now and the hipsters can’t get enough. I’m told there’s a potential bourbon shortage so there’s a mini stock pile in the house. Someone also told me that the hipsters are moving on to gin and I’m hopeful this pans out so I can go back to being the coolest kid on the block. (But don’t worry dad, I think they’ll be more into the Hendricks than the Gordons so your gin stash is safe.)

But my love of all things bourbon pre-dates my legal drinking age and it’s rooted in these amazing holiday treats that are also my grandfather’s favorite. They’d show up in a wrapped tin with my grandfather’s name on it each Christmas and we’d sit in a circle opening gifts and eyeing that package so he wouldn’t be able to open it on the sly and stash them away. Inevitably, he’d sneak a little of the paper off and then open the lid just enough to be sure it was what he hoped it was and our cries of “what is it? will you share?” would be met with “oh it’s nothing…nothing…moving on…” until our relentless pestering wore down his defenses and he’d pass the tin around so we could all steal one of the treats that were so rightfully his.

Sort of a cross between cookie and fudge, the bourbon ball was the earliest vehicle by which bourbon made its way to my mouth and it was love. My aunt and cousin make them with crush Nilla Wafers (Google tells me this is the traditional Kentucky way) but I prefer a brownie-based ball because it’s more absorbent (read: soaks up more bourbon). It’s also one of the few recipes that doesn’t require me to remember to soften butter; something I’m profoundly incapable of doing.

I adapted my recipe from the Martha’s Rum Ball recipe. Apart from the obvious substitution, I adjust quantities to account for the thing Martha has plenty of that I do not: storage space for the extra 1/2 stick of butter and 2 oz of baking chocolate that her recipe leaves behind. Double it and you get even amounts of the key ingredients and more bourbon balls: win/win.

BOURBON BALLS
(aka My Balls are Tastier than Martha’s)

  • Vegetable oil, cooking spray
  • 3 sticks unsalted butter, cut into pieces
  • 12 ounces semisweet chocolate (chips are ok, Bakers is better)
  • 1 tablespoon instant espresso powder (optional)
  • 6 large eggs
  • 1 cup packed light-brown sugar
  • 2 teaspoons pure vanilla extract
  • 1 teaspoon coarse salt
  • 1 1/2 cup all-purpose flour
  • 3/4 cup bourbon (don’t be cheap…use the good stuff)
  • Coarse sanding sugar, for rolling

You start by making a rich, dry brownie. Preheat your oven to 350’F and prep a 12X17 rimmed sheet pan with a sheet of parchment and a generous spritz of cooking spray.

Melt the chocolate, butter, and espresso powder together over a double boiler. Let cool while you mix the eggs, brown sugar, vanilla, and salt together in a large bowl. Slowly add the chocolate and butter, stirring constantly so you don’t cook the eggs. Add in the flour and stir just to combine.

At this point, you’ve got the world’s best brownie batter and if you put it in a regular brownie baking dish you’d be happy. But you want a dry, absorbent brownie so instead you’re going to spread it out on the cookie sheet and bake for 15-20 minutes until it looks like this:

You want it to be shiny and have some cracks like this:
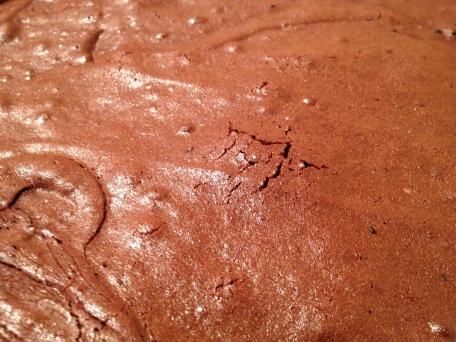
Let the brownie cool, breaking it up when it’s cool enough to handle so it starts to dry out a little. I baked my batch, broke it up, ran some errands, then proceeded. Drier = boozier final product.

Once they’re completely cool, put the brownie bits in the bowl of an electric mixer fitted with the paddle attachment.
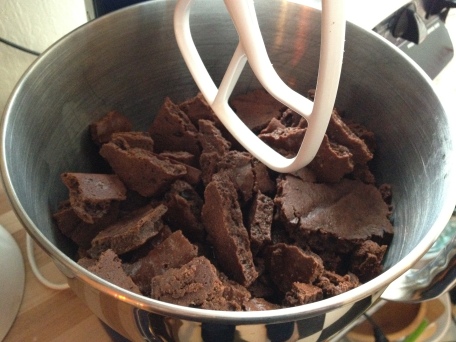
Pour on the bourbon (resist the urge to go overboard…) and beat at a low speed for 2 minutes then a medium speed for 5 minutes. It’s ready when it starts to stick together like a cookie dough and you can pick up a piece and make a ball.

Let it chill out in the bowl for an hour or two (or overnight) then remix on medium for another few minutes. This gets any lumps out and makes it easier to scoop. There’s also the chance that it will dry out enough that you can add a little more bourbon.

At this point, you’re ready to scoop into 1 tbsp balls, shape, roll in sanding sugar, and place in adorable little paper cups.

When you’re done, you’ll have something that looks like this and a lot of happy friends:

A few notes about equipment:

You’re probably wondering “Where the hell do I get sanding sugar?” The internets, of course. If you’re in San Francisco, you can go to Sugar ‘n Spice in Daly City. If you’re in the boonies like my mom, you can go to your friendly neighborhood grocer and ask to buy some from the baking counter. Don’t do this in San Francisco. The look they’ll give you could kill. Rumor has it that Williams Sonoma also stocks it but you’ll need a trust fund to make that work.

You should also plan to invest in one of these if you don’t have one already.

They come in tons of sizes, again, available on the internets.

Makers Mark makes the best bourbon balls.

Posted in Uncategorized

Small apartment Christmas tree solution

20111202-143804.jpg

Came up with this one when I was still in my 400 sq foot studio and rolled it out this year since we’re not going to be around for the whole holiday so a tree seemed wasteful. Two nails, a curtain rod, a single strand of lights, some ornaments, and a big Manhattan later, here it is.

Ho Ho Ho!

Tagged with: , , ,
Posted in Uncategorized

Two hours, one skein of yarn, one awesome cowl

Super quick and fun project for a friend’s upcoming birthday. Got the pattern free with the yarn from my favorite SF yarn shop: Imagiknit

20111127-225241.jpg

Tagged with: , , ,
Posted in knitting

Creamed corn: My new favorite side dish

Oh…oh my god. Oh…wow. Wow. I mean, wow. Why didn’t I make five times as much of tonight’s dinner?

D is having some dental work done and is under doctor’s orders to avoid all chewing for three weeks. This has meant at least three things:

  1. We finally had that excuse I’ve been needing to invest in a Vitamix
  2. I’ve had to get awfully creative with mashed potatoes, refried beans, smoothies, and soups
  3. He’s missing out on the best of sweet corn season, and that just seems to be a crime
So today at the farmers market, in addition to the many smoothie ingredients I scored, I zeroed in on some amazing-looking corn and needed to find some way to get it into my non-chewing husband. I tried corn soup last week but fell short of the amazing dish I had at Gary Danko that ruined me on corn soup forever (a story for another post…) but then I remembered a tempting creamed corn recipe from an ages-old Cooking Light that I’ve moved at least five times.

The recipe calls for very few ingredients – fresh corn, milk, cornstarch, s+p, leeks, and bacon – but I found myself without the bacon (I know, epic fail) so I just improvised a bit. I cannot emphasize enough how yummy this dish turned out to be. It’s like the best of corn on the cob and the best of polenta together at last. The texture is incredible. The flavor is outrageous. And it’s perfectly suited to the elderly or dentally-challenged.

It also bears absolutely no resemblance to this stuff:
Creamed Corn

Low Fat Creamed Corn with Leeks

15 minutes
Serves 2

2 ears corn on the cob
1 tbsp butter
2 inches of leek, rinsed well and finely chopped
2/3 cup lowfat milk
1 tsp cornstarch
Salt and pepper to taste

Sautee the leeks in the butter in a large saucepan over medium-low heat until very soft. Add a little water if they crisp up.

Meanwhile, prep the corn. Holding one corn cob in a large, deep bowl shave the kernels from the cob using a vegetable peeler. This technique, as opposed to cutting the kernels off with a knife, leaves you with finely grated corn floating in a nice starchy milk.

Combine half of the corn mixture with all of the remaining ingredients in food processor or blender. I used an immersion blender. Then add all of the corn and corn/milk mixture to the sauce pan with the leeks. Increase heat to medium and cook, stirring occasionally, until thick. This should take about 5 minutes.

Posted in recipe

Caramelized onions are like the butter of the gods

Caramelized onions are so good they’ve brought me back from a laziness-induced semi-retirement from blogging. I made a big batch of these when my CSA box showed up overflowing with oniony goodness. When six large onions and a half of a stick of butter spend two hours or so in a big old Le Creuset dutch oven truly magical things happen.

This slideshow requires JavaScript.

Things I did with this batch of onions:

  • Used as a key condiment in a turkey sandwich
  • Tossed with pasta, peas, and roasted chicken for a simple supper
  • Mixed with ricotta cheese for a homemade ravioli filling (with wonton wrappers…so easy)
  • Gave a jar to a friend who had us over for a truly exceptionally amazing dinner
  • Smeared on toast with crumbled goat cheese
  • Filled an omelet along with spinach and ham
It’s my goal to always have some in the fridge or freezer since there’s nothing a little bit of caramelized onion can’t improve upon.
Posted in recipe

Mini plant pot wrappers – by popular demand

I’ve gotten a few requests for the paper template we used to wrap the seedling pots our wedding favors came in. You know, these guys:

succulents wedding favors

Again, we just used the standard plastic seedling pot that the succulents came in. We wrapped them in paper and used printable gold foil labels from Paper Source to add the decorative seal.

So here’s the template file. Click to view in full screen and print.

Tagged with: , , ,
Posted in wedding

Speaking of adorable baby heads…

Check out my gorgeous little cousin, Charlotte, holding my brand new niece, Paige. Matchy matchy.


Posted in knitting
Categories